|
Metal Toxicity
Purpose:
The purpose of the Metal Toxcity lab was to see how living organisms in an ecosystem respond to pollutants (Iron and Nickel). Halo was used to represent organisms within the ecosystem of the Great Salt Lake.
Protocol:
Day 1:
1. Please put on gloves, goggles and aprons. Restrain long hair and loose clothing.
2. Using the pre-made labels, fill in your name, group ID, and date. Also label one of the tubes “BLANK” and the others #1, #2, or #3.
3. Using the 10 mL glass pipette and bulb, pipette 5 mL of CM (complete media) into each of the four Falcon tubes.
4. Identify in the tables below the concentration of metal that you are testing. These tables tell you the final concentration of metal to which the cell culture will be exposed and the volume of stock metal solution you must add to 5 mL of CM to reach this concentration.
Table A. IRON SULFATE
Groups A |
1 |
2 |
3 |
4 |
5 |
6 |
7 |
8 |
|
Final Sample Conc. (mM) |
0 |
2.5 |
5 |
6.5 |
7.0 |
7.5 |
8.5 |
10 |
|
1 M FeSO4Stock Soln. (µL) |
0 |
12.5 |
25 |
32.5 |
35 |
37.5 |
42.5 |
50 |
Add this volume to 5 mL of CM |
Table B. NICKEL SULFATE
Groups B |
1 |
2 |
3 |
4 |
5 |
6 |
7 |
8 |
|
Final Sample Conc. (mM) |
0 |
0.25 |
0.5 |
0.75 |
1.0 |
1.5 |
2.0 |
2.5 |
|
0.25 M NiSO4 Stock Soln. (µL) |
0 |
5 |
10 |
15 |
20 |
30 |
40 |
50 |
Add this volume to 5 mL of CM |
5. To the four tubes now containing 5 mL CM each, use the p20 micropipette to add the appropriate volume of stock metal solution. Important: If the micropipette tip touches any surface, including the CM, change the tip before dipping into the metal stock solution.
6. Using the p200 micropipette, add to each of the three Falcon tubes labeled #1, #2, or #3, 100 µL of Halobacterium NRC-1 starter culture. Do not add Halobacterium to the tube labeled “blank.”
7. Tightly cap and place each Falcon tube in a shaking incubator, at 37°C & 220 rpm for 48 hours.
Day 2:
1. Retrieve your samples from the shaking incubator.
2. Using a Kimwipe, clean the outside surface of glass cuvettes.
3. Make sure the wavelength is set at 600 nm.
4. Transfer the contents of the Falcon tube labeled “BLANK” into the first cuvette.
5. Using a Kimwipe, place the cuvette into the spectrophotometer. Make sure the mode button is set on absorbance. The spectrophotometer will blink “BLA” several times before it settles on 0.00. Remove blank.
6. Using a Kimwipe, carefully transfer the remaining samples to the other three cuvettes.
7. Measure and record in your lab book the absorbance value for each of the three samples. Be certain to use the blank to re-zero the spectrophotometer between each reading.
Results:
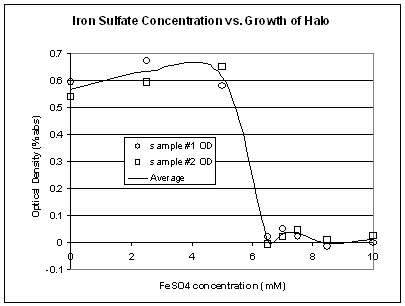
From the graph above, it can be seen that there is a threshold for the amount of FeSO4 that Halo will continue to grow in (5mM FeSO4). Once the concentration passes the threshold, Halo starts to die.
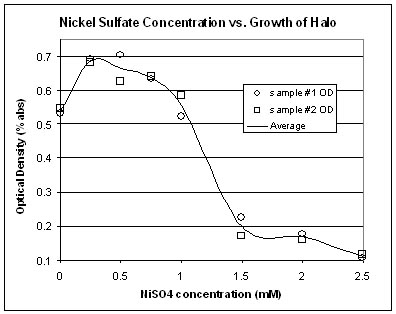
Halo's response to NiSO4 is similar to that of FeSO4, but the threshold is not as distinct with NiSO4. As seen above, the decrease in Halo growth is more gradual as the concentration of NiSO4 increases.
[back to top]
|