| |


Preparing New Cultures/Making Complete Media
Salinity Lab
BR Lab
Metal Toxicity
Halobacteria Genomic DNA extraction
Copper Absorbance Spectrum Lab
Knock-Out Lab


|
|
BR Lab
Purpose:
To find out how Halo responds to the amount of light in their enviornment.
Protocol:
1. On a clear falcon tube, use a permanent marker to mark the 5 mL line.
2. Pour 5 mL of Complete Media (CM) into the falcon tube. If you overpour, use a beral pipet to remove the appropriate amount of CM.
- Pour all of the CM from the clear tube into your dark tube, since you cannot see the markings on the dark tube. Repeat the process with your other dark tubes.
- Fill the remaining clear tubes with 5mL of CM
3. Gently swirl the Halobacterium culture. Use your unused beral pipet to remove exactly 1 mL of Halobacterium from the tube. Place it into one of your tubes containing 5mL of CM. Place the cap tightly on your sample tube, to the second stop, and gently invert the tube to ensure the sample is evenly mixed.
4. Repeat steps 3 and 4 for your other sample tubes.
5. Using the labeling tape, label the organism’s name (Halo), the date, the sample number, and the condition being tested (either light or dark). Keep in mind that light will shine through your culture, so do not block it with your label.
6. Take the beginning optical density (OD) of your culture. To do this:
Pour each of your samples into a separate clean cuvette. Set the spectrophotometer to absorbance and to a wavelength of 600 nm. Use Kim wipes when handling cuvettes. To zero the spectrophotometer, insert provided blank, press blank button and wait for zero to appear. Insert cuvette with sample; record absorbance reading. Pour your sample back into your falcon tube for incubation. Repeat with each of your samples and record these numbers as the beginning optical density. If your numbers are not nearly identical, describe possible reasons why in your lab notebook.
7. Incubate your samples at 37°C and 220 rpm with a full spectrum light bulb. Record the time and date your incubation began.
8. In your lab notebook, make a prediction about what will happen to the cell growth and resulting absorbance in the future days. Also, predict how the sample may change in appearance.
Day 2 Protocol:
After at least 48 hours, obtain your three samples from the incubator. Record the time and date the incubation stopped. Gently agitate and pour each sample from the tube into a clean, empty cuvette.
To spin down your cells:
Using a beral pipet, transfer 1.5 mL from your sample to an empty microcentrifuge tube. You can use the markings on the pipet to first draw out 1 mL, then 0.5 mL. Snap the lid tightly closed. Use a permanent marker to label the outside of your microcentrifuge tube with your group name, the sample number and the sample type (light or dark). Repeat this for each of your samples. Take your samples to the microcentrifuge. Symmetrically place tubes inside a centrifuge so they balance each other out, otherwise the centrifuge may break. Close the lid and turn the centrifuge on for 15 minutes. Remove your tubes from the microcentrifuge and locate the cells (pellet) at the bottom of the tube. Without agitating the cells, use a beral pipet to remove the liquid above the cells.
To measure your cell density:
Use the remaining sample in your cuvette to measure the absorbance of each sample. See the procedure in step 7 from Day 1. Run blank before each sample. Record data in your data table.
-
RETURN CUVETTE SAMPLE TO FALCON TUBE - DO NOT DISCARD. You will need the cell pellets for your next lab activity.
Clean up your lab space and equipment.
Do NOT USE SOAP when cleaning equipment. Rinse cuvettes thoroughly three times with hot tap water. -
Rinse one more time with deionized water.
Results:
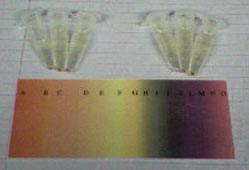
The Halo that was grown in the light (right 3) had a more purple color than the Halo that was grown in the dark (left 3); the Halo that was grown in the dark appeared to be more orange.
We hypothesize that this is because the Halo that was grown in the light produced bacteriohodopsin (the light sensing protein), while the Halo grown in the dark didn't produce a UV protective pigment. The differnece in color between the Halo grown in the dark and in the light demonstrates Halo's ability to respond to their enviornment; if they do not have enough light to produce bacteriohodopsin and convert light energy into chemical energy for the production of ATP, then they have the ability to not express bacteriohdopsin and express a different protein.
[back to top] |
|