This simulation uses an everyday technology (cell phones) to illustrate
ideas about networks in biology. The picture of the interconnected phones is
called a graph or network. Each circle represents (in this
case) a cell phone, but it could represent any entity, including components
of a food web or genes and proteins. The generic name for these circles
(which are not always circles),
no matter what they are representing, is nodes. For the purposes of
this simulation, the terms node and cell phone can be used
interchangeably. The lines that go into and out of each node are called
edges. The edges in this graph have arrows which means they are
directed edges, and that signals can only move in the direction
indicated by the arrow.
To knock out a node means to remove its edges, so that no signals
can originate from or move through the knocked out node. To reactivate
a node means to restore its edges.
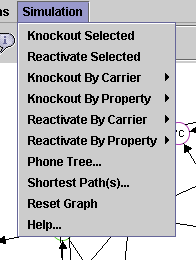
The Simulation menu is the right-most menu in the menu bar. It contains virtually all the commands you will use. The first five menu items are concerned with knocking out and reactivating nodes or groups of nodes. If your window does not contain a Simulation menu, close the program and reload it. If the menu continues to not load, please try running the program with a different web browser (i.e. If you were using Firefox, please try Explorer.).
Each phone has several properties and capabilities. It has a name/phone number,
such as "3E." It also has a carrier (service provider). Different carriers
are indicated by the node border colors. Also, each phone may have one or more of
of the following capabilities: email, picture, and roaming.
To knock out all selected nodes, read about how to
select nodes in Cytoscape. Then you can select and deselect nodes and
experiment with the "Knockout Selected" and "Reactivate Selected" menu
commands.
Knocking out phones by carrier or by capabilities is even easier. Say that
you want to send a picture to everyone in the network--everyone, that is,
whose phones can receive pictures. First you must knock
out all phones that do not support picture capability. The menu command for
that is: Simulation/Knockout By Property/Phones Without/picture.
Whenever you knock out a phone or group of phones, there is a corresponding
reactivate command. But if you forget what you knocked out, you can always
reactivate the entire network by choosing the "Reset Graph" menu command. The
"Help" command pops up a web browser with this page. The "Shortest Path(s)..." and
"Phone Tree..." commands are discussed below.
The "Shortest Path(s)..." menu command pops up the following dialog:
As you might imagine, this dialog allows you to determine the shortest
path(s) between two nodes. Remember, each phone can only call the other
phones in its phone book (the ones its outgoing edges point to), so you can't
just draw the shortest line across the network.
Say the shortest path between A and B is 3 edges long. It is still possible
that there is more than one 3-edge path between A and B (this is in fact
the case with 1A and 7E, though the path is longer). This dialog will
display all the shortest paths, but will only animate the first one.
To use the dialog, choose the beginning and the end of the path
in the appropriate dropdown lists. Then click "Find Shortest Path(s)."
The nodes and edges will turn red as the path is followed, and the text
box in the middle of this dialog will display the number of edges
traversed in this path. You can select an optional delay (in milleseconds)
that will occur before drawing each edge.
The "Clear" button will remove the red coloring from edges and nodes so that you
can try another path. For example, you might be experimenting to see if
there is a path between 2E and 4E. You try it
and see that yes, there is a path of 5 edges between them. Now press
"Clear" to reset the nodes and edges along the path to their normal color.
Then you go to the graph (while leaving this dialog open) and knock out
2A (click on 2A, then choose Simulation/Knockout Selected).
Go back to the dialog and click "Find Shortest Path(s)" again.
This time it takes a different path, avoiding 2A--this path is one edge
longer. You can repeat this process
indefinitely, knocking out and restoring nodes in order to change the path
taken, or to see if there still is a valid path.
Click "Close" when
done with this dialog (note that any path animation that may be occurring
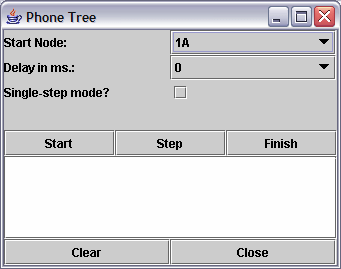
will continue despite closing the dialog). The "Phone Tree..." menu command pops up the following dialog:
The Phone Tree is a way to propagate messages across the network. You choose
a starting phone, then that phone calls every phone in its phonebook, those
phones call every phone in their phone book, and so on, until everyone
who can be called is called. The behavior of the phone tree can be changed
and constrained by knocking out and reactivating nodes in the network.
The simplest use of the dialog is just to pick a starting node and press
"Start." You will see the phone tree in action. The text box in the
center of the dialog fills with information about who is calling who. When
all possible calls have been made, another dialog pops up telling you
who made the most (and least) calls and who received the most (and least) calls.
It also tells you the total calls made and received.
You can also specify a delay in milliseconds to occur between each step of
the phone tree. That will make it clearer who is calling who.
You can also step through the phone tree one step at a time if you
check the "Single-step mode?" checkbox. Then press "Start". That will
execute the first step. To execute subsequent steps, click the "Step" button.
(The delay is ignored in single-step mode). If you don't want to keep
stepping through manually, you can click "Finish" and the phone tree
will be completed automatically using the delay you have set.
The "Clear" button behaves like it does in the "Find Shortest Path(s)" dialog.
It allows you to reset the state of the graph so you can try another phone
tree without having to close and reopen the dialog.
A couple things that you may find slightly confusing: The "Step" and "Finish" buttons are not used except in single-step mode.
When running the phone tree with a delay, it may appear that text
box messages keep popping up well after the phone tree is completed. This is
not the case. Oftentimes, the tree must traverse edges that have already
turned red, so the progress of the tree can be invisible during those
moments. For a better idea of when the tree will end, keep an eye
on all edges that have not yet turned red. When they all turn red, the
tree has ended and the text box messages will stop.
Experimentation with the phone tree is encouraged, particularly in
conjunction with knocking out various sets of nodes.
To select a node, simply click on it. Its background color should
change to gray. Nodes and edges are often close together or overlapping,
and edges can be selected too, so be sure you are clicking on a node,
not an edge.
To select additional nodes, hold down the Shift key while you click on them.
To quickly clear your node selections, just click on any empty area
of the graph.
To select all nodes, clear your selection as described above, then type
Control-V. (Technically this "inverts" your selection, meaning nodes that
were not selected before are now selected, and vice versa.)
Another way to select a group of adjacent nodes is to use your mouse
to drag a box around the adjacent nodes. You can then type Control-N to
display the selected nodes in a new window as a network of their own. You can
run all the simulator tools on this sub-network. Sometimes, however, if a
lot of dialog boxes and network windows are open at the same time, it can
be confusing to keep track of which dialogs go with which networks.
For more information about selecting nodes and other Cytoscape capabilities,
please see the links in the next section.
Halobacterium Research Group
@ Institute for Systems Biology
and Bellevue School District
(BSD).
Supported by a grant from the National Science Foundation (0313754) to Drs. Nitin S. Baliga and Leroy Hood as well
as financial support from the BSD.
Simulation model: John Thomson*, Sarah Nehring+, Dan Tenenbaum, Paul
Shannon
Laboratory experiments: Gregory Alvarado*, Stephanie Gill*, Megan
Meislin^, Claudia Ludwig+, Jeanine Sieler+, and Marc Facciotti Handbook: Simin Marzanian+, Camille Scalise+, Claudia
Ludwig+, Jeanine Sieler+, Sarah Nehring+ Outreach: Patrick Ehrman (ISB) and Kathee Terry (BSD) Project Leader: Nitin S. Baliga *=High School Student Interns; +=High School Teachers; ^=Undergraduate
Student Intern
Any opinions, findings, and conclusions or recommendations
expressed in this material are those of the author(s) and do not
necessarily reflect the views of the National Science Foundation.
To further our goal of bringing current science into classrooms, scientists and programmers have adapted Cytoscape for student use. Typically, Cytoscape is used to visualize and integrate molecular interaction networks with various data, such as gene expression profiles. In our cell phone simulation, students have the opportunity to use this program to model and interrogate the structure and properties of a cell phone network. This familiar subject helps to illustrate numerous ideas about biological networks. To access the curricular materials used with this simulation, please click here. To run the cell phone simulation, please click here.
Finding the Shortest Path(s) Between Two Nodes

Contributors
Disclaimer